The Pledge mail merge report is used to help you prepare letters to send out to your congregation that contains information about the pledges that they've made. This report will produce an export to a spreadsheet, a Microsoft® Word mail merge, or a Comma-separated value file, which you can use to produce your letter.
- To access the Pledge mail merge report, open the Contributions module, click Other Reports, and choose "Pledge mail merge"
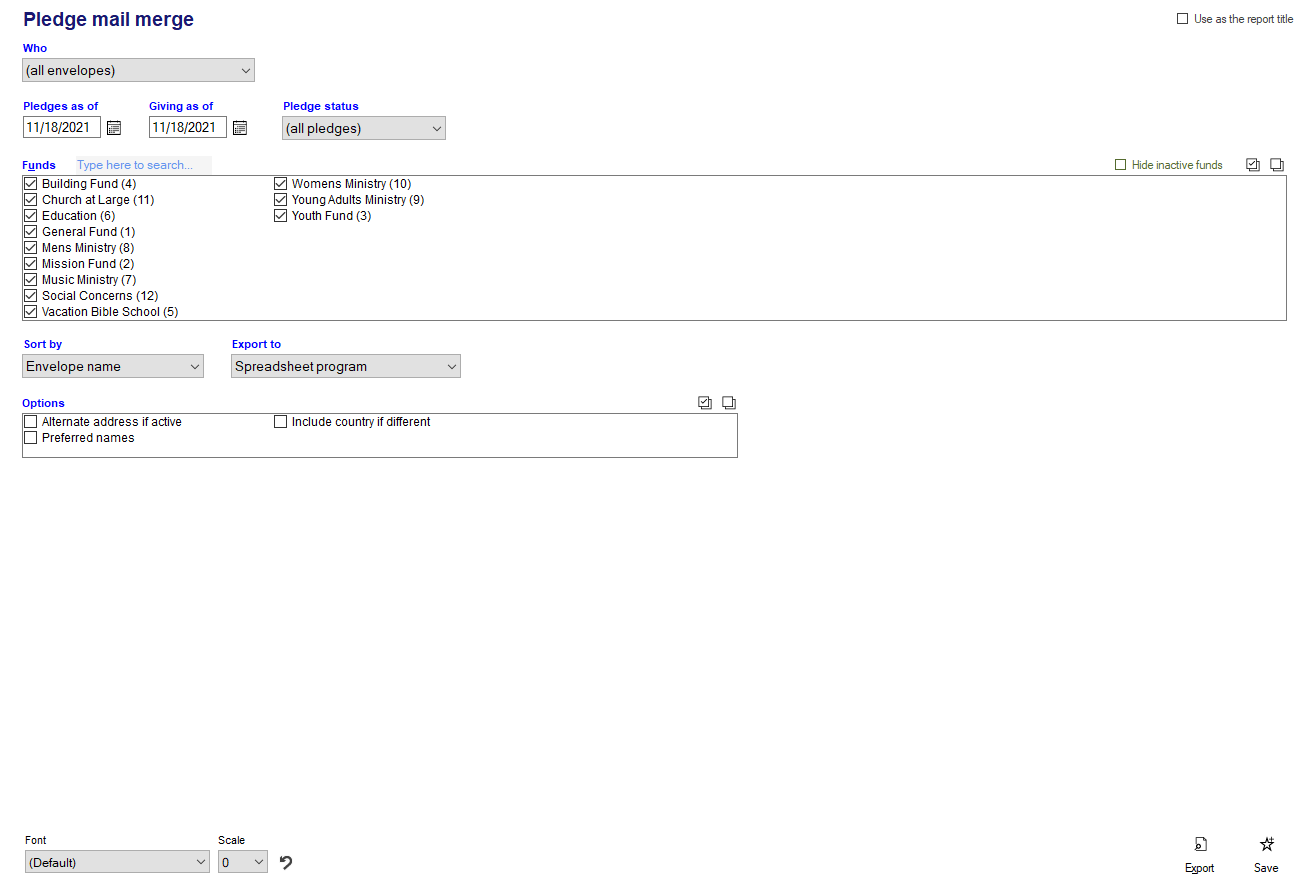
- Select which group of contributors you want to consider for this report in the "Who" box. Options include (all envelopes), Active Envelopes, Inactive envelopes, among others. You can also select a particular subgroup by choosing the "* For a subgroup" option", a particular list or grade by choosing the "* For a list or grade" option.
- The "Pledges as of" field lets you set up to what point in a pledge you want to see on your report. For example, if a contributor has a pledge for $100 dollars a month to a fund from 1/1/2021 through 12/31/2021, and you set your "Pledges as of" date to 11/30/2021, the pledged to date on the report will read $1100.
- Note: in this example, if you set it to 11/15/2021 instead, it will only show $1000, because the 11th pledged installment of $100 isn't "due" until the end of the 11th month.
- This field will also control which pledges you'll see on your report. Any pledges that don't have any active dates that match the date you set in this field will not appear.
- This means any pledges for prior years or pledges that have not started by the date set in this field will not appear on your report.
- The "Giving as of" field lets you select what the cut-off date is for offerings to be considered for the pledges on this report. For most reporting, this date will match your "Pledges as of" field.
- The Pledge status field will also control which pledges appear on your report:
- (all pledges) - This option will show all pledges within the date range of the report, regardless of fulfillment status.
- Fulfilled - This option will show only pledges within the date range of the report if the "Given as of" amount meets or exceeds the "Pledged as of" amount for a pledge. (Contributor has met or exceeded their pledge)
- Not fulfilled - This option will only show pledges within the date range of the report if the "Given as of" amount falls below the "Pledged as of" amount for a pledge. (Contributor has not yet met their pledge)
- More than this amount - When using this option, you'll set a dollar figure in the box that appears, and then choose if you're looking for those who are that far "ahead" (or more) on their pledge to date, that far "behind" (or more) on their pledge to date or those who have that much remaining (or more) on their total pledge. This option will then only show pledges that fall within the date range of the criteria you set.
- More than this percent - This is similar to "More than this amount" but instead of setting a dollar figure, you'll set a percentage "ahead", "behind" or "remaining". To enter your percentages, put them in like this: 5.5 for 5.5 percent. You do not need to enter 0.055 to get 5.5 percent, and this would give you .55 percent instead.
- Select which funds you would like to include on your report in the "Funds" box. Check off only the funds you'd like to include on the report. If you're having trouble finding a particular fund, start typing the fund name in the "Type here to search..." box, and the fund will be highlighted. If you don't want to see any inactive funds in the list, make sure you check the "Hide inactive funds" box.
- The Sort by field controls how your data will be sorted in the exported report. "Envelope name" will sort your data by the envelope name of each contributor, "Envelope number" will sort your data by each contributor's envelope number, "Upcoming env. number" will sort your data by each contributor's next envelope number, and "Postal code" will sort your data first by each contributor's zip or postal code, then by envelope name.
- The Export to field will let you select how you're exporting your data from the report. "Spreadsheet program" will export the data from this report into your computer's default spreadsheet program (typically Excel). Microsoft® Word mail merge will export the data from this report to Microsoft® Word, with your fields ready to select and use in the "Insert Merge Field" section of Word (Macros must be enabled in Word for this option to work properly). Comma-separated values (CSV) will export your data to a CSV file which you can save to your computer.
- The options section provides three options. "Alternate address if active" will use the personal or household alternate address, if it is currently active in the Membership module of Shepherd's staff, in place of the primary household mailing address. "Preferred names" will list people's preferred names, as listed in the Membership module, instead of their first names in the Giver's First Names field of the export. "Include country if different" will add a column for which country a giver is in if their country differs from the country that the church is in.
- Click the "Export" button to export your report to the option you selected in the "Export to" field.