Shepherd's Staff does not store the photos in your database. This helps make the database smaller and more portable since the database file will fit on a smaller flash drive. Shepherd’s Staff makes a copy of each photo and stores it in a different location. Shepherd's Staff then keeps track of where the photo is and grabs that photo whenever it needs to. But if those photos are moved, changed, or renamed, then Shepherd's Staff will not know which photo to display. The Photo Maintenance Utility can help fix these discrepancies without requiring a full photo restoration.
The Photo Maintenance Utility can be used to fix a record that is displaying the wrong photo or is not displaying a photo when it should. This utility also can help when the original photo has been moved or deleted or is corrupt. Restoring all photos from a backup can fix these problems, but this will erase any new images or change updated images to match what was in the most recent backup. The Photo Maintenance Utility is an easier way to fix one or two images when you do not want to restore all photos.
Here is how to open the Photo Maintenance Menu:
- Close out of all modules in Shepherd’s Staff, make sure you are on the Shepherd’s Staff Central Window
- Select “Tools” at the top of the window.
- Choose Backup and Restore, and then choose “Photos”.
- Click on the “Photo Maintenance” tab.
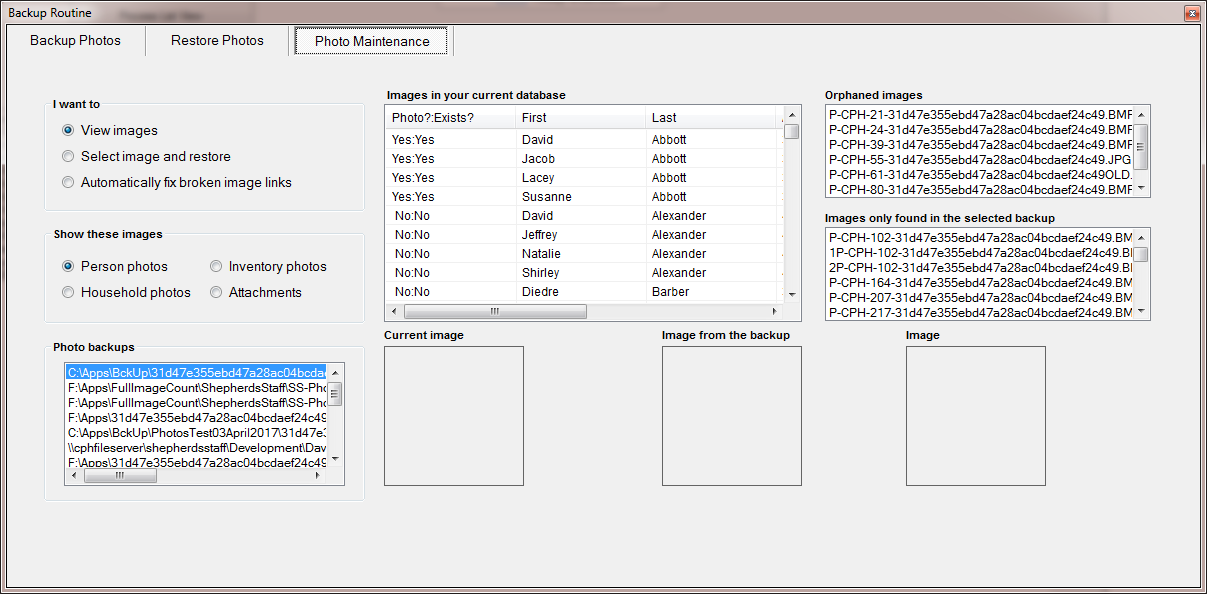
The “Photo Maintenance” view contains the following elements:
» I want to—Each option changes what the Photo Maintenance Utility does. “View images” allows you to just view the images that are supposed to be there. “Select image and restore” is used to restore one specific image. “Automatically fix broken pointers” will attempt to fix records that are missing images or showing wrong images.
» Show these images—Allows you to choose which set of photos you would like to work with.
» Photo backups—Allows you to select a specific backup to compare your current database to.
» Images in your current database—This chart is where you can determine which photos have issues. The first column shows which records are supposed to have images and if they have images. "Photo?" means Shepherd's Staff is supposed to be showing an image. "Exists?" means there is a photo attached to the record. (There are four combinations of these that will be covered later in the article.) This chart also shows the record's name.
» Current image—When you select a row in the "Images in your current database" chart, the “Current image” box will display the image that is currently associated with that record.
» Image from the backup—This box displays the image in the backup database for the selected record.
» Image—This box displays the orphaned image that is selected in the “Orphaned images” section.
» Orphaned images—This section lists images that are in the Shepherd's Staff image folder but are not used for any records.
» Images only found in the selected backup—This lists the images that are found in the backed-up database, but are not currently in the Shepherd’s Staff image folder.
The "Images in your current database" section has a column called "Photo?:Exists?". This column has four possible combinations:
- Yes:Yes—The record is supposed to have an image and it does have an image.
- No:No—The record is not supposed to have an image and it does not have an image.
- No:Yes—The record does not have an image saved to it, but there is an image for it in the drive. This means that there is an orphaned image that applies to this record. The image folder has a photo with the person’s name on it, but the photo is not saved as part of their record. This can be fixed by clicking "Automatically fix broken pointers" in the “I want to” section.
- Yes:No—The record is supposed to have an image, but there is no image. This can be fixed by restoring a backup or a single image.
To restore an individual photo:
- In the “I want to” section, select “View images”. You can preview the images you would like to restore by clicking on them in the “Images only found in the selected backup” section. Clicking on the image will select the entry in the "Images in your current database" section. You may have to press the up arrow and then the down arrow to refresh the list.
- In the “I want to” section, click “Select image and restore”.
- Click ok on the dialog box.
- Either select the person record in the “Images in your current database” section or select the image in the “Images only found in the selected backup” section.
To confirm that the restoration worked, look for the “I want to” section and select “View images”. Then select the record in the “Images in your current database” section.