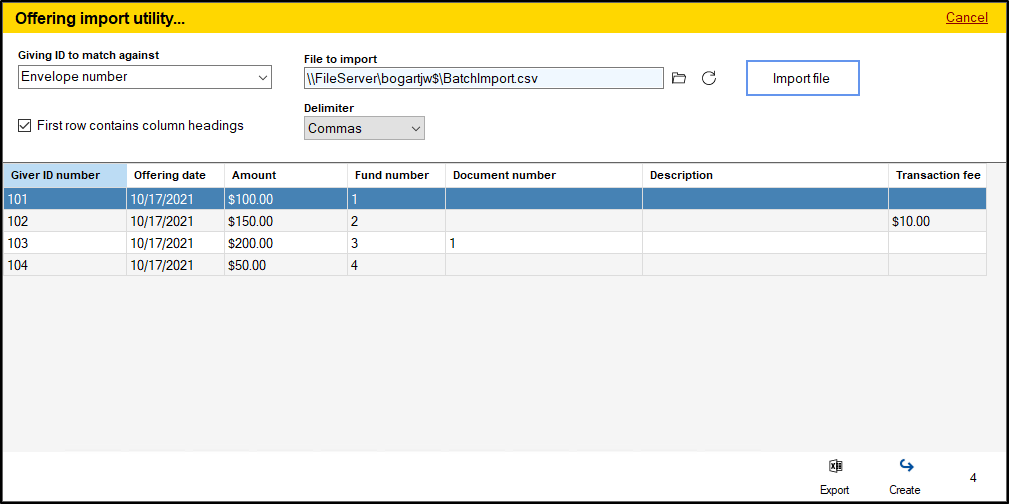
The Import from other giving source utility allows you to import offerings from a CSV or TXT file. This is useful if you use an e-giving platform other than Vanco, as this will give you an option to import your offerings from these services. The import files will need to be set up in either a CSV or TXT format, which can be done in Excel. While column headers are not required, you should enter your information in the following order (And you can use the following as column headers if you wish)
- GiverID - This is the giver's unique identifying number in the system you're importing from. This can match their envelope number in Shepherd's Staff, or any of the Giving ID's you've set within that contributor's record.
- FundNumber - The Fund Number for the fund in Shepherd's Staff that correlates to the fund to be imported.
- OfferingDate - The date of the offering. If more than one date is in your import file, a separate offering batch will be created for each date.
- GivingAmount - The amount given for the offering.
- DocumentNumber - A check number or other identifier. This field is optional, but the column must be included in your file.
- Description - A description for the offering, up to 100 characters. This field is optional, but the column must be included in your file
- Transaction Fee - If applicable, the charge by the online giving provider for handling the transaction. You can exclude this column completely if not used; the import utility will automatically adjust for the remaining columns.
- In Contributions under Giving>Batches click the "Import" button at the bottom of the grid and choose "Other giving source".
- In the window that appears, choose the GivingID you're going to be matching up with that was set up in your file. You can choose the giver's envelope number, Vanco ID (Giving 1) or Giving ID 2-5. These refer to the giving ID fields within a contributor's record.
- If your import file includes column headers, check the box for "First Row contains column headings". Shepherd's Staff will retain this setting next time you use the import utility.
- Choose the delimiter on your file. If you used a CSV file, your delimiter will be Commas, if you used a TXT file, you'll need to look at your file and see if the information is separated by commas or tabs, and choose your delimiter appropriately.
- To the right of the "File to import" window, click the file folder icon to bring up the file explorer window. Navigate to where you have the file saved on your computer, and double click it to open the file.
- Click the "Import file" button. This will attempt to bring your file into Shepherd's Staff. If successful, you will see your file appear in the bottom section of the import window. Otherwise, Shepherd's Staff will provide you with a message describing what may be causing your file to not import.
- Click the "Create" button to let Shepherd's Staff create offering batches for each date you imported offerings for.