Every church collects offerings differently and therefore the batch entry screen has many optional ways of entering offerings. There are a variety of options available when entering your offering batches that can streamline and make your offering entry process quick and easy to use.
When you add a batch, you'll first select what date your offering batch is for, and then click the "Continue" button to go into the offering batch. On the batch entry window, if you realized you selected the wrong date, click on the pencil icon to the left of where the date is listed, and you can change what date the offering batch is for.
The next option is your entry method. You can switch between methods by clicking the icon to the left of the contributor drop list. There are two options:
- Free Input Method - This method allows you to choose a contributor, fund, and amount they gave. The amount you enter will be for just the one fund you selected. If a contributor gives to multiple funds, you'll add another line for that same contributor but to a different fund.
- Totals Method - This method will let you select a contributor and the first fund the contributor gave to, but then, will ask you the total amount that contributor gave within this batch. You'll then choose how much the contributor gave to the selected fund. If there are funds remaining, you'll then need to enter in another line for the next fund that the contributor gave to, and the amount that they gave to that fund. You'll repeat this process until the total amount the contributor has given has been distributed to each of the funds that the contributor has given to.
Next, you'll select which contributor you want to enter an offering for. When you click the drop list, you'll see all your contributors listed alphabetically. Above your contributors, you'll see two other options, (other giver) and (anonymous).
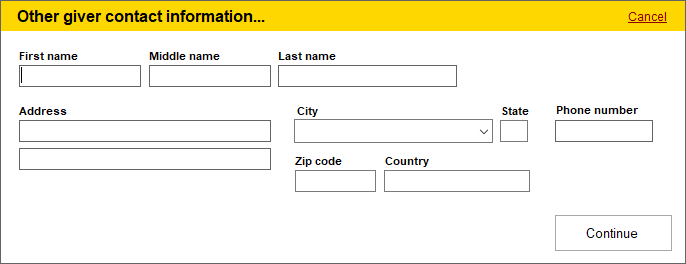
The (other giver) option will bring up an "Other giver contact information.." window. This is where you can enter in the information of who this other giver is. This is a way you can enter offerings for a one-time giver and be able to provide them with a contribution statement later. If you enter the same person on a later batch (this will need to have the exact same spelling and capitalization) this will also be added to their statement.
The (anonymous) option is used for givers who you don't have any information on, or for loose offerings. This will not produce a contribution statement.
If you want to add a new contributor while still in your offering batch, click the green + button, and you'll be taken to the Add Contributor window where you can add a contributor to the list of contributors. When you click Save, you'll be brought back to the batch entry window.
If you check the "Enter by envelope number" box, when you click inside the contributor box, you'll be able to start typing in an envelope number to pull up a person, instead of typing in a name.
Next, you'll be able to select which fund the offering was given to. If you want to enter your offerings by fund number instead of by fund name, check the "Enter by fund name" box. After you select your fund, if you uncheck the box to the left of the "Enter by fund name" box, it will lock in that fund so that same fund gets used again for the next offering you enter. To the left of that box, you'll see an option to set an option for "Advance Fund on Copy" or "Mirror Fund on Copy". This works with the copy function at the bottom of the page.
The copy function will make a copy of the offering you select. If you use the Advance Fund on Copy option, this will create the copy, but increase the fund number by one to go to the next fund. The Mirror Fund on Copy option will create an exact copy of the offering you selected.
Note: The Add Contributor button allows new contributors to be added during the Batch entry process.
- Make sure that the Date is correct.
- Check the boxes you want to use. In this case we are checking “Hide Special Description” and “Hide Check number.”
- The Envelope Number can either be typed in or selected from the drop list. Press ENTER or TAB on your keyboard.
- Type in the fund or select it from the drop list. Press ENTER or TAB on your keyboard.
- Type in the amount of the offering. You do not need to enter the $ sign. If it’s a whole dollar amount for the offering like 20, you don’t need to enter a decimal. Press ENTER or TAB on your keyboard to move to the next row.
- Once you are done entering in the Batch, you may want to click the “Batch Totals” button to see a summary of your current Batch.
- Now that the Batch is complete, click 'Save' and then the red "X" to close the window.
- Our next step is to post the Batch.
After closing the Batch entry screen, you will be returned to the Offering Batches window. You will see your Batch (or Batches) in this window. At this point the Batch is still temporary and can be edited by highlighting the Batch and clicking the Edit button which will re-open the Batch entry window.
However, since this Batch is still temporary it won’t show on any other grids or reports. In order to make that happen, we must post this Batch. The posting process takes the lines within the Batches and creates an “Offering Record” for each line.
The posting process is also what allows the Contributions module to communicate with Attendance and Finance. You will have the options to:
» Create an Attendance Batch—This allows you to select an event in attendance to create a Batch for. Everyone that gave an offering will be placed in a Batch in the Attendance module which can then be edited to add the rest of the people who came. Click the question mark button for instructions on enabling this feature.
» Create a Deposit in Finance—This option will create a deposit in Finance based on the funds in the Batch and what finance accounts those fund records are attached to.
- Make any necessary edits to the Batch. Verify that the date is correct.
- Reports can be printed to review the Batch before posting by highlighting the Batch and clicking Print. (The detail and summary reports will print during the posting process as well).
- Once the Batch is complete and verified, highlight it and click the “Post” button.
- At this point you get the options to create an Attendance Batch or a Deposit in Finance. Check or uncheck these boxes based on your needs. If you are making a deposit, make sure that the Deposit Date is the actual drop date at the bank.
- Click OK to start the post.
- Answer any verification questions that come up to continue.
- You will receive a message saying the post was successful.
- After Posting, the Batch disappears and the lines become permanent Offering records.